

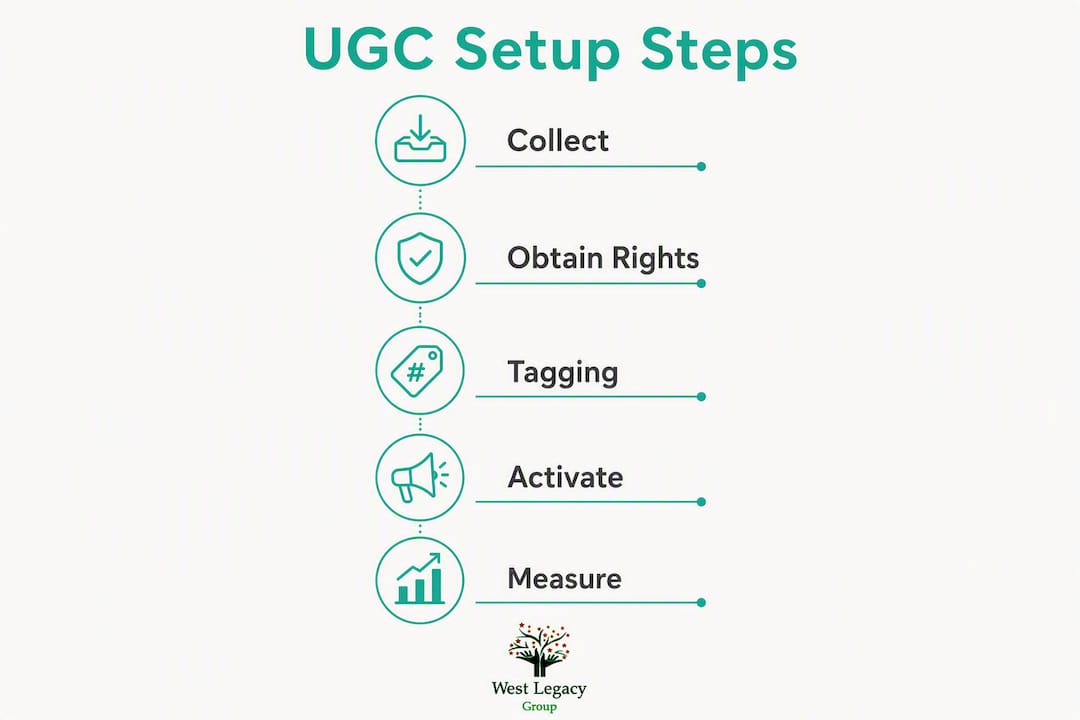
Set up your user-generated content (UGC) store by building five connected layers: a collection engine, an explicit rights process, a tagging system, on-page activation, and a measurement loop. Start with your top five product detail pages (PDPs) and one automated post-purchase review request. That single combination, done well, will move conversion faster than any other content investment you can make this week.
Your 5-step starting checklist:
- Pick your top five revenue-generating PDPs and flag them as UGC priority pages.
- Install a Shopify-compatible review app and activate a post-purchase email sequence timed 7–10 days after delivery.
- Set up a photo and video upload option in your review request, not just a star rating.
- Add a rights consent checkbox or statement to every submission form before content goes live.
- Place approved UGC in a shoppable gallery directly below your product photos on each PDP.
Recommended Shopify apps for Australian stores:
- Shopify Product Reviews — native, free, best for stores starting out with text reviews.
- Judge.me — generous free tier, strong automation, suits most small-to-mid stores.
- Okendo — built for Shopify, excellent photo/video UGC and loyalty integrations.
- Yotpo — enterprise-grade, suits stores with high review volume and paid social ad needs.
- Loox — photo-first, clean visual galleries, popular with DTC brands.
Australian legal callout: Under Australian privacy law and copyright, you need explicit written permission before repurposing a customer’s image or video in any marketing channel. A social media mention alone does not grant reuse rights.
Table of Contents
- What is UGC and why does it drive conversions for ecommerce?
- Where and how to collect UGC: practical methods you can start this week
- Shopify technical setup: apps, installation and configuration for Australian stores
- What permissions and moderation do you need for Australian stores?
- How to display UGC on product pages and marketing channels for better conversion
- Incentive structures and campaign templates that increase UGC submissions
- How to measure UGC impact: KPIs, tracking and reporting
- West Legacy Group’s 10-step checklist and an Australian Shopify example
- Key takeaways
- Why UGC strategy matters more than UGC volume
- West Legacy Group can help you build this properly
- Useful sources and further reading
What is UGC and why does it drive conversions for ecommerce?
User-generated content is any content created by your customers or independent creators rather than your brand. It covers a broad range of formats:
- Star ratings and written reviews — the most common form, and still the highest-volume trust signal.
- Customer photos and short-form video — product-in-use imagery that brand photography rarely replicates.
- Social posts and tagged stories — organic mentions on Instagram, TikTok, and Facebook.
- Q&A threads — customer questions answered by other buyers, which reduce pre-purchase friction.
- Unboxing and testimonial videos — longer-form content that works in ads and on PDPs.
The conversion case for UGC is well established. Research from Northwestern University’s Spiegel Research Centre found that displaying reviews can increase conversion rates significantly, with the effect strongest for higher-priced products where purchase risk feels higher. Beyond on-site conversion, UGC feeds your paid social creative pipeline at a fraction of the cost of produced video, and it gives search engines fresh, keyword-rich content on your product pages.
There is an important distinction worth making early: organic customer UGC and paid creator UGC serve different purposes. Organic content from real buyers carries authenticity that no brief can manufacture. Paid creator content gives you control over format, framing, and coverage for new SKUs or specific campaign angles. The strongest programs run both lanes simultaneously, with separate rights workflows for each.
Where and how to collect UGC: practical methods you can start this week
Stores that build the full collection system — from request to rights to tagging to activation — consistently outperform stores that simply install a widget and wait. Collection is where most Australian merchants stall, so here is a concrete sequence to follow.
Step-by-step collection checklist
- Activate a post-purchase review request email timed 7–10 days after expected delivery. Ask for a photo or short video alongside the written review.
- Add a QR code to your packaging that links to a lightweight upload page. Keep the page to one field: “Drop your photo or video here.”
- Place an in-cart or post-checkout prompt inviting customers to share their experience after they receive their order.
- Launch a branded hashtag on Instagram or TikTok and monitor it weekly using a social listening tool or a simple saved search.
- Brief paid creators using a structured one-page brief that specifies format, length, usage rights, and the key message you need covered.
Sample email and on-site copy templates
Post-purchase review request email (send 7–10 days after delivery):
Subject: How did [Product Name] land?
Hi [First Name],
We hope [Product Name] is everything you expected. If you have a moment, we’d love to see how you’re using it — a quick photo or a few words makes a real difference for other shoppers.
[Leave a review + photo →]
As a thank-you, we’ll add $5 store credit to your account once your review goes live.
On-site submission prompt (below product description):
Packaging QR landing page headline:
Contests and incentives: what works in Australia
Gift card draws, loyalty points, and store credit are the three incentive types that consistently lift submission rates for Australian merchants. Prize draws require you to publish full terms and conditions under Australian Consumer Law, including the draw date, prize value, and eligibility rules. Keep the terms on a dedicated page and link to them from every contest post or email.
Briefing creators vs asking customers
When you brief a paid creator, specify: format (vertical video, 15–30 seconds), key message (one benefit, not three), usage rights (site, email, paid social, duration), and payment terms. When you ask a customer, keep the ask minimal: one photo, mobile upload accepted, immediate micro-reward on approval.

Pro Tip: Ask for one photo first, not a review and a photo and a video. Every extra field you add reduces submission rates. Once a customer uploads a photo, follow up with a second email asking if they’d like to add a short video for additional store credit.
Shopify technical setup: apps, installation and configuration for Australian stores
The app you choose shapes your entire UGC workflow, so pick based on where you are now and where you need to be in six months.
App primers
- Shopify Product Reviews — Shopify’s native tool, free, integrates directly with the Shop app. Best for stores that need basic star ratings and written reviews without additional cost. Limited photo/video capability.
- Judge.me — free tier covers most small store needs, with automated review requests, photo uploads, and review widgets. Australian merchants can use it without currency or payment friction.
- Okendo — purpose-built for Shopify, strong photo and video UGC, loyalty integrations, and detailed analytics. Pricing is publicly listed on the Shopify App Store.
- Yotpo — suited to higher-volume stores that want to pipe UGC directly into paid social campaigns. Supports SMS review requests, which can lift response rates for Australian mobile-first shoppers.
- Loox — photo-first galleries with clean visual design. Popular with DTC brands that want a polished lookbook aesthetic on their PDPs.
Installation and configuration checklist
Installation:
- Install your chosen app from the Shopify App Store and connect it to your product catalogue.
- Enable photo and video upload permissions in the app settings.
- Connect the post-purchase review request automation to your order fulfilment trigger.
- Set moderation to manual approval before any content appears on the storefront.
Configuration:
- Set post-purchase request timing to 7–10 days after expected delivery (not order date).
- Configure at least one automated reminder, sent 3–4 days after the first request if no response.
- Add your incentive (store credit or loyalty points) to the confirmation message shown after submission.
- Set file size limits for uploads (typically 10–20 MB for photos, 50–100 MB for video) to avoid slow page loads.
- Add descriptive alt text fields to your review widget so UGC images carry SEO value.
Pro Tip: Manually managing UGC galleries is one of the most common mistakes Shopify store owners make. Use your app’s auto-populate feature with a manual approval gate — you get scale without sacrificing quality control.
Creator asset workflow
For paid creator content, build a simple four-step pipeline:
- Intake form — creator submits assets via a shared form (Google Forms or your app’s creator portal) with their name, SKU, and content type.
- Rights agreement — creator signs a usage agreement before you download or activate any asset.
- Tagging — tag each asset with SKU, format (image/video), channel (PDP, email, paid social), and rights status.
- Approved asset pipeline — approved assets move to a dedicated folder or app library, ready for activation.
Fragmented workflows can delay creator asset activation by 40–60%, which is why centralising everything inside your chosen app matters from day one.
Testing checklist
- Place a test order and trigger the post-purchase review request manually.
- Submit a sample photo and video through the customer-facing upload flow.
- Verify the widget appears correctly on your top five PDPs on both desktop and mobile.
- Test the mobile upload flow on an iOS and Android device.
- Confirm that approved content populates the gallery and that unapproved content does not appear publicly.
What permissions and moderation do you need for Australian stores?

Getting rights wrong is the fastest way to damage customer trust and expose your business to a copyright claim. Australia’s copyright framework means the creator of an image or video owns it automatically, regardless of where it was posted.
Organic customer content vs paid creator content
A customer tagging your brand on Instagram has not given you permission to use that content in your ads, on your website, or in your emails. You need explicit, written reuse permission. A social mention is not a licence.
For paid creators, usage scope must be documented in writing before production begins. The agreement should cover: site use, email use, organic social, paid social, editing rights, term (how long you can use it), and whether the creator retains ownership or grants an exclusive licence.
Consent template examples
Customer submission consent (add to your review/upload form):
Paid creator usage agreement (key clauses to include):
Moderation checklist
- Set all submissions to pending approval before they appear on the storefront.
- Define clear reject criteria: off-brand content, competitor mentions, inappropriate imagery, unverified claims.
- Build a reporting workflow so customers can flag content they find offensive.
- Document your takedown process: who receives the request, how quickly you act (aim for 48 hours), and how you notify the submitter.
- Keep records of all written permissions, including the date, the submitter’s name, and the specific content covered.
Pro Tip: Store metadata with every asset at intake: uploader name, submission date, product SKU, rights status, and approved channels. This makes your library searchable in six months and auditable if a rights dispute arises.
How to display UGC on product pages and marketing channels for better conversion
Placement determines whether UGC converts or gets ignored. Visual UGC galleries perform best when placed directly below product descriptions or photos, with shoppable tags that let shoppers open a product drawer without leaving the gallery.
Where UGC works hardest
- PDP photo carousel — customer photos alongside brand imagery, placed above the fold where possible.
- Video block near the buy box — a short testimonial or unboxing video placed within 300px of the add-to-cart button.
- Homepage trust module — a curated row of customer photos with star ratings to establish credibility on first visit.
- Lookbook or gallery page — a dedicated page for lifestyle UGC, useful for fashion, homewares, and outdoor brands.
- Email campaigns — a single strong customer photo in a post-purchase or re-engagement email lifts click-through rates.
CRO rules for UGC placement
Keep your PDP gallery tightly mapped to the specific product shown. A photo of a different colourway or an unrelated product in the gallery creates confusion and erodes trust. Use review highlights to address the most common objections directly: if customers frequently mention sizing, surface that feedback prominently near the size guide. Add shoppable image tags so a customer clicking a lifestyle photo can add the featured product to their cart in two taps.
A/B test ideas
- Gallery vs no gallery placed directly below product photos.
- Single best UGC asset vs a carousel of five near the buy box.
- Review highlight snippets in the add-to-cart area vs standard star rating only.
- Homepage trust module with UGC photos vs brand photography only.
Schema and SEO
Adding Review schema markup to your UGC-driven review widgets helps search engines surface star ratings in organic results. Most Shopify review apps (Judge.me, Okendo, Yotpo) generate this schema automatically, but verify it using Google’s Rich Results Test after installation. Add descriptive alt text to every UGC image — “customer wearing [Product Name] in [colour] outdoors” outperforms “image001.jpg” for both accessibility and SEO on your product pages.
Incentive structures and campaign templates that increase UGC submissions
The incentive does not need to be large. What matters is that it is immediate, clear, and tied directly to the submission action.
Campaign templates
Post-purchase request sequence (3 emails):
- Email 1 (Day 7 post-delivery): Photo/video request with $5 store credit offer.
- Email 2 (Day 11): Reminder with social proof (“Join 200+ customers who’ve shared their photos”).
- Email 3 (Day 21): Final ask, framed as community contribution rather than incentive.
Seasonal hashtag campaign:
Creator brief playbook (one-page brief structure):
- Brand context: two sentences on who you are and what you sell.
- Content goal: one specific message (e.g., “show how the product fits into a morning routine”).
- Format: vertical video, 15–30 seconds, no hard sell.
- Deliverables: three raw files plus one edited version.
- Usage rights: site, email, paid social, 12 months.
Micro-incentive loyalty flow:
Connect your review app to your loyalty programme (if you use one) so that every approved photo submission automatically credits points to the customer’s account. This removes the manual step and makes the reward feel instant.
Pro Tip: Combining organic customer requests with paid creator briefs gives you both authenticity and coverage. Use creators for new SKUs or specific campaign angles where you need a controlled message; use customer requests for social proof on your established products.
For prize draws, publish full terms and conditions on a dedicated page and link to them from every campaign touchpoint. Under Australian Consumer Law, draws require a permit in some states (Victoria and South Australia have specific requirements), so check your obligations before you launch.
How to measure UGC impact: KPIs, tracking and reporting
UGC work without measurement is content for its own sake. Tie every collection and activation effort to a revenue metric from the start.
Core KPIs
- Review volume — total approved reviews per product, tracked weekly.
- Conversion lift on UGC-enabled PDPs — compare conversion rate on pages with UGC galleries vs those without.
- Click-through from UGC modules — how many visitors click into a shoppable gallery or video block.
- Average order value (AOV) with UGC exposure — compare AOV for sessions that included a UGC interaction vs those that did not.
- Cost-per-acquisition for creator content — total creator spend divided by attributed conversions from those assets in paid social.
Tracking checklist
- Tag UGC-driven landing pages with a UTM parameter (e.g.,
utm_source=ugc&utm_medium=gallery). - Create a GA4 segment for sessions that include a UGC gallery interaction or review widget click.
- Set up a custom event in GA4 to fire when a user clicks a shoppable UGC tag.
- Track revenue per session for UGC-driven segments vs your site average.
- Export weekly performance data from your review app and cross-reference with Shopify’s native analytics.
Stores that treat UGC as marketing inventory — with clear tagging, rights status, and activation tracking — consistently extract more measurable value than those managing assets in spreadsheets or cloud folders.
Reporting template
Weekly report (5 minutes to compile):
- New reviews submitted vs approved.
- Top three UGC assets by click-through this week.
- Any creator content live in paid social and its click-through rate.
Monthly report:
- Conversion rate on UGC-enabled PDPs vs non-UGC PDPs.
- AOV for sessions with UGC interaction.
- Total UGC asset library size and rights-cleared percentage.
- Creator content cost-per-acquisition vs brand-produced creative.
Use your review app’s built-in export features for submission data, Shopify Analytics for revenue attribution, and your ad platform’s reporting for creator content performance. Keeping these three sources separate but reviewed together gives you the full picture without building a complex dashboard.
West Legacy Group’s 10-step checklist and an Australian Shopify example
This checklist reflects the rollout sequence West Legacy Group recommends for Australian Shopify merchants starting from scratch or rebuilding a fragmented UGC setup.
10-step UGC rollout checklist
- Identify your top five revenue-generating PDPs and designate them as UGC priority pages.
- Install your chosen review app (Judge.me or Okendo for most Australian stores) and connect it to your product catalogue.
- Activate a post-purchase email sequence with a photo/video upload option, timed 7–10 days after delivery.
- Add a rights consent statement to every submission form before content goes live.
- Build your asset tagging system: SKU, format, channel, rights status, submission date.
- Set moderation to manual approval with a 48-hour review target.
- Place approved UGC in a shoppable gallery directly below product photos on each priority PDP.
- Add Review schema markup to your review widgets and verify it in Google’s Rich Results Test.
- Set up GA4 tracking for UGC-driven sessions and conversion events.
- Review weekly KPIs (review volume, conversion lift, AOV) and iterate on your request copy and incentive.
A compact Australian Shopify example
Consider a Sydney-based homewares store with 80 SKUs and no existing UGC programme. The recommended starting point is not all 80 products — it is the five best-selling items that account for the majority of revenue. The store installs Judge.me, activates a post-purchase email at day 8 post-delivery, and adds a $5 store credit incentive for approved photo submissions.
Within the first four weeks, the store typically moves through three operational stages:
- Week 1: Test order placed, review request triggered, sample photo submitted and approved, gallery widget verified on mobile and desktop.
- Weeks 2–3: First 50 real customer submissions arrive. Moderation queue reviewed daily. Top 10 photos selected for PDP galleries.
- Week 4: Galleries live on all five priority PDPs. GA4 tracking confirmed. First weekly report compiled.
The content recovery and reuse approach West Legacy Group applies to content projects follows the same principle here: build the system once, then let it compound. UGC collected in month one is still converting in month twelve.
Key operational notes for Australian merchants:
- Use Australian English in all review request copy (“colour” not “color”, “favourite” not “favorite”).
- Check state-specific prize draw permit requirements before launching any contest with a prize over $500.
- Store all written permissions with a timestamp and the submitter’s email address for privacy compliance.
Key takeaways
Setting up a UGC store on Shopify requires five connected layers — collection, rights, tagging, activation, and measurement — and the fastest win is a post-purchase photo request on your top five PDPs.
| Point | Details |
|---|---|
| Start with five PDPs | Focus your first UGC effort on your top five revenue pages, not your entire catalogue. |
| Automate the request | A post-purchase email at 7–10 days post-delivery, with a photo upload option, is the single highest-return collection action. |
| Rights before activation | Get explicit written consent from every customer and creator before placing their content on your site or in ads. |
| Tag assets at intake | Record SKU, format, channel, rights status, and submission date for every asset so your library stays searchable and auditable. |
| West Legacy Group’s approach | West Legacy Group helps Australian Shopify stores build the full UGC system — from app setup and rights workflows to PDP activation and GA4 measurement. |
Why UGC strategy matters more than UGC volume
The conventional wisdom says collect as much UGC as possible and let the volume do the work. That is not quite right. A gallery of 200 low-quality, poorly lit photos placed on the wrong page will hurt conversion, not help it. What actually moves the needle is a smaller set of well-placed, rights-cleared assets on the pages where buying decisions happen.
The stores that get the most out of UGC are the ones that treat it the way they treat any other marketing asset: with a clear intake process, a quality bar, and a measurement loop. The collection tactics and app recommendations in this guide are not complicated, but they do require you to build the system properly the first time rather than bolt things together as you go.
For Australian merchants specifically, the rights question is not optional. Copyright in Australia vests with the creator automatically, and the reputational cost of using someone’s image without permission outweighs any short-term conversion gain. Build the consent workflow into your submission form from day one and you will never have to retrofit it later.
UGC also fits into a broader content strategy for small businesses. The community content approaches that work for local SEO apply directly here: authentic, place-specific, customer-created content builds both trust and organic visibility in ways that brand-produced content cannot replicate at the same cost.
West Legacy Group can help you build this properly
Australian Shopify stores often have the right products and the right customers, but the UGC system is missing or fragmented. West Legacy Group works with small businesses and ecommerce operators to build the full setup: app selection and installation, post-purchase request flows, rights consent workflows, PDP gallery activation, and GA4 measurement configuration.
The practical difference is that you get a working system, not a list of recommendations to implement yourself. West Legacy Group handles the technical configuration, the copy for your review request emails, the rights consent language, and the reporting setup, so your UGC programme is collecting and converting within weeks rather than months.
What West Legacy Group delivers for Shopify UGC projects:
- App installation and configuration (Judge.me, Okendo, or your preferred tool).
- Post-purchase email sequence copy and automation setup.
- Rights consent language tailored for Australian merchants.
- PDP gallery placement and shoppable tag configuration.
- GA4 event tracking for UGC-driven sessions and conversions.
- Monthly reporting on review volume, conversion lift, and creator content performance.
If you are ready to build a UGC programme that actually connects to revenue, get in touch with West Legacy Group to discuss your Shopify store’s setup. You can also explore our small business website design packages if your PDP layout needs work before galleries go live.
Useful sources and further reading
These are the primary sources referenced throughout this guide, along with recommended further reading for Australian Shopify merchants who want to go deeper on specific areas.
- Shopify UGC: A Step-by-Step Activation Guide — JoinBrands — the most detailed operational guide available for Shopify UGC, covering collection, rights, tagging, and activation in sequence.
- Complete guide: setting visual UGC galleries for Shopify stores — Psychreg — practical placement guidance for Shopify galleries, including shoppable tag configuration and moderation workflows.
- User-generated content — Shopify Enterprise Blog — Shopify’s own coverage of UGC strategy, including integration bottlenecks and enterprise-scale considerations.
- Collect Content from Creators — CreatorCommerce — detailed guidance on creator content intake, tagging systems, and asset management for ecommerce brands.
- How Online Reviews Influence Sales — Spiegel Research Centre, Northwestern University — the foundational academic study on review volume, star ratings, and conversion lift.
- Review schema markup — Schema.org — the technical reference for implementing Review structured data on product pages.
- FTC Endorsement Guides — FTC.gov — US-based guidance on disclosure requirements for paid creator content; useful as a reference point, though Australian merchants should confirm requirements with the ACCC.
- Niche UGC Creator Marketplace guide — Cristioa — practical overview of how niche creator marketplaces work, including brief standardisation and licensing management.
- West Legacy Group: content recovery and reuse case study — a West Legacy Group case study on building reusable content systems for small businesses.
- West Legacy Group: local business community content examples — practical examples of community-driven content strategies relevant to Australian ecommerce merchants.